
")


Starting your own tabletop hydroponics herb garden is not as complicated as you might think. With no experience, I was able to start, maintain and bring my garden to full maturity in 60 days.
Hydroponics can be a little more tedious than traditional gardening methods, but if you know how to avoid and correct the most common pitfalls, you should find success fairly easily.
Starting seedlings

Supplies
- 2 plastic salad containers
- Rockwool grow cubes (1.5 inches)
- Handheld sprayer
- Seeds
- 2 Bayco utility reflector lights with clamp
- 2 6500K bulbs (compact fluorescent)
- General Hydroponics FloraGro, FloraMicro and FloraBloom
- 1 gallon distilled water
- General Hydroponics pH testing kit
- General Hydroponics pH up and pH down
- 3 12 ml syringes
- Pipette
- 1 clean chop stick
Note: Scroll down to find additional supplies for your hydroponic bath under “Building a hydroponic bath.”
Setup
- Test pH level of your spring water. For optimum growing conditions, you want to make sure its pH level is close to 6.
- Adjust the pH level of your spring water accordingly. If your pH is higher than 6, you’re going to want to mix in a few drops of General Hydroponics pH down and retest. Likewise, if your pH is lower then 6, mix in a few drops of pH up and retest. Repeat this process until you’ve reached a pH of 6. Be sure to rinse your pipette in between uses.
- Mix nutrients into spring water. Measure out 5 ml of General Hydroponics FloraMicro, FloraGro and FloraBloom in the syringes. In this order, mix 5 ml FloraMicro, FloarGro and FloraBloom into the water. The FloraMicro has to be added first. If it’s not nutrient lockout occurs.
- Widen holes in rock wool grow cubes, using a chopstick.
- Thoroughly wet rockwool grow cubes.
- Place rockwool cubes in plastic salad containers — 4 per container.
- Put 1-2 seeds in each rockwool cube.
- Using pipette, liberally drip nutrient water onto seeds.
- Set the lids on top of the containers without closing them.
- Hang lights over the containers and turn them on.
- Make a diagram of the containers, so you can identify the seedlings through early growth.
General Care
Your sprouts should start emerging within the first week. Check to make sure the rockwool is still damp daily. If to seems to be drying out, water your seedlings with nutrient water as needed.
Troubleshooting
There are a number of things that can go wrong when you’re starting seedlings. Some of the most common pitfalls include mold growth, overexposure to wind, slow-growing sprouts, too much or too little light, using too many seeds and choosing seed varieties that aren’t compatible in similar growing conditions.

Mold growth. Mold growth was the most common and most prevalent problem I encountered. It wiped out my first two attempts starting seedlings and indirectly was the reason the next two attempts failed. The key to preventing mold growth seemed to be getting the seeds to sprout quicker. There are a number of factors that can impact their growth rate, which I cover below.
Wind exposure. Trying to combat the mold, I took the lids off the containers and put a small fan next to them. While the air circulation helped with the mold problem, it also wiped out the plants. The seedlings weren’t established enough and the fan totally dried them out.

Stunted sprouts. After mold wiped out my first attempt and the fan fried my second attempt, peroxide stunted the sprouts in my next two attempts. I tried the peroxide to prevent the mold, but both times the sprouts took twice as long to get started or didn’t start at all. After that, they continued to grow slow and ended up stunted.
Lighting. By my fifth attempt, I had a hunch that quicker seed growth might be the key to conquering mold growth. So I upgraded the lights to 6500K compact florescent bulbs to improve the seedling growth. They definitely helped them get off to a quicker, healthier start. However, the plateaued. When I noticed the slow-down I started giving them an 8-hour break every night and I turned the lights off. This seemed to improve their growth.
Limiting seeds. I reduced the number of seeds I put in each rock wool cube to get the seedlings started faster and to reduce incidence of mold. A cluster of seeds sitting in the bottom of a damp rock wool cube holds in moisture, and where there’s moisture there’s the potential for mold. By putting less seeds in the cube, you can reduce moisture and reduce the odds of mold growth. You can also reduce competition among seeds. If you put five seeds into one cube and all five sprout, those seedlings will always be competing with one another, likely slowing down growth.
Choosing seed varieties. Choosing seed varieties is more important than you might think. Some plants are just more compatible than others in a shared growing environment. You want to choose seed varieties with similar growth habits and nutrient requirements. I learned the hard way, on my fifth attempt, that selecting compatible seed varieties matters. Growing lettuce and Bok Choy alongside my herbs, I quickly discovered that these leafy plants made it harder for the herbs to grow. Not only did they mature much faster, but their foliage also blocked light from getting to the herbs.
Using nutrient water. On my sixth attempt, I mixed nutrient water to start my seedlings with instead of regular water. This was a vital change. Not only did my seedlings get started faster, but they were healthier.
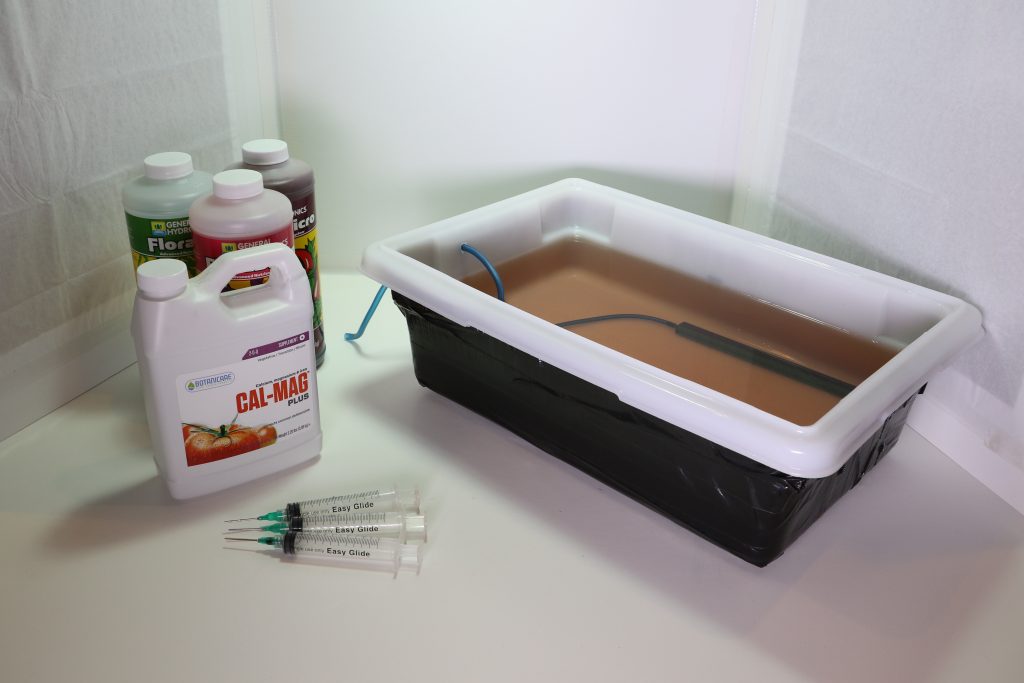
Building a hydroponic bath

My seedlings were ready to put in the hydroponic bath two weeks after I initially planted them. You’ll be able to tell your seedlings are ready when you start to see tap roots emerging from the bottom of the rockwool cubes. Once the roots can reach the nutrient water in the hydroponic bath, you want to prepare it and move them as soon as possible.
Supplies
- Tetra Whisper air pump
- 3/16-inch airline tubing
- Air stone
- Aquarium check valve
- 3-gallon tub with lid
- 2 gallons distilled water
- 2-inch hydroponics slotted mesh net pots
- 2 Bayco utility reflector lights with clamp
- 2 6500K bulbs (compact fluorescent)
- General Hydroponics FloraGro, FloraMicro and FloraBloom
- General Hydroponics pH testing kit
- General Hydroponics pH up and pH down
- 4 12 ml syringes
- Pipette
- Aluminum foil
- Black duct tape
- 2-inch hole saw
- Clay hydroponic growing media
- Botanicare Cal-Mag Plus
- Scissors
- TDS meter
Note: You should already have some of the supplies listed from starting your seedlings.
Setup
1. Cover the bottom of your tub with black duct tape.
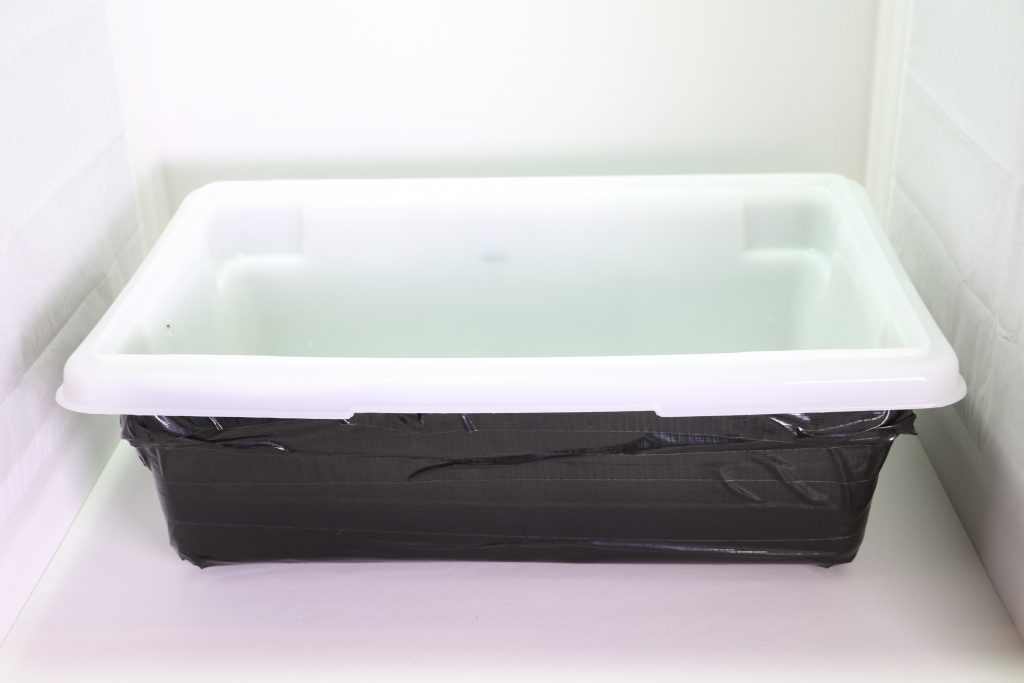
Keeping the light out of your hydroponic bath is going to be crucial to prevent unwanted growth of mold and other organisms. Once your hydroponic bath is tainted, it’s game over.
2. Mark the 2-gallon waterline.
Measure out 2 gallons of water, pour them in your tub and mark the waterline. Save your spring water to add later and use tap water for this step instead. You’ll need to sanitize your tub before adding the spring water and mixing in the nutrients.
3. Drill a hole for your airline.
Your airline is going to have to run through one of the sides of your tub to connect the air stone in the hydroponic bath to the air pump on the table next to it. You want to make sure to drill the hole towards the top of the tub, above where the 2-gallon waterline will be. Use a 3/16-inch drill bit, so that the airline fits snuggly through the hole.
4. Drill holes for the net pots.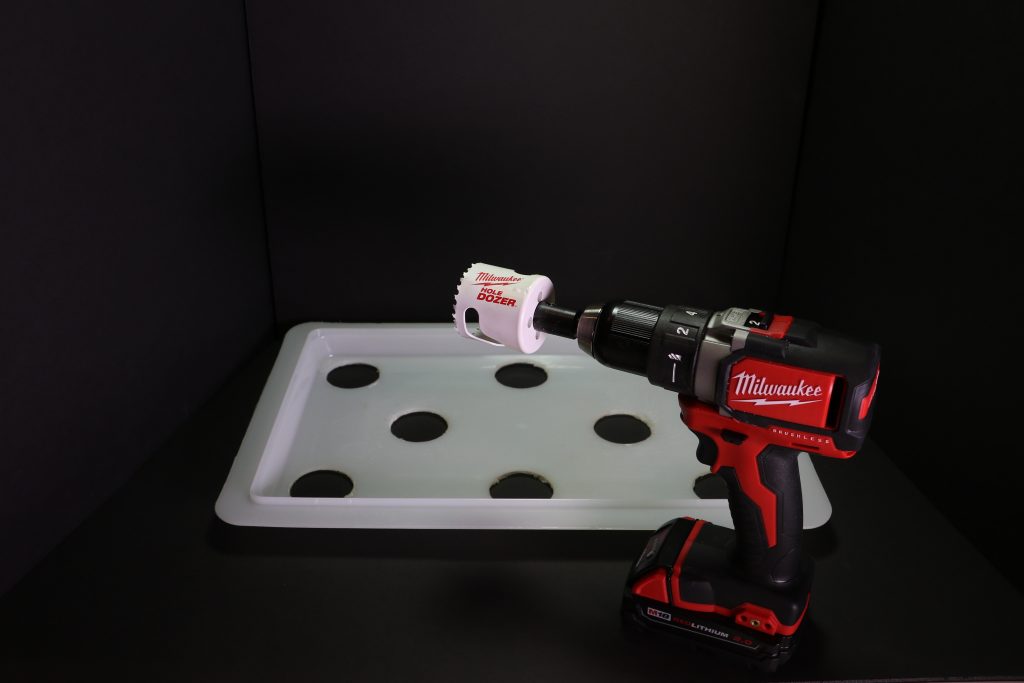
Arrange your net pots on top of your lid to determine spacing and mark off the areas you plan on drilling. I planned for eight holes total with three rows running longwise, offsetting the holes in the center row to be between the holes in the outer rows. Once you’ve marked off your holes, use your hole saw to drill through.
5. Thoroughly clean your tub and lid.
After you’ve finished altering your tub and lid for the hydroponic bath, thoroughly clean them and all other equipment involved. I used hydrogen peroxide to sanitize mine.
6. Set up your air pump.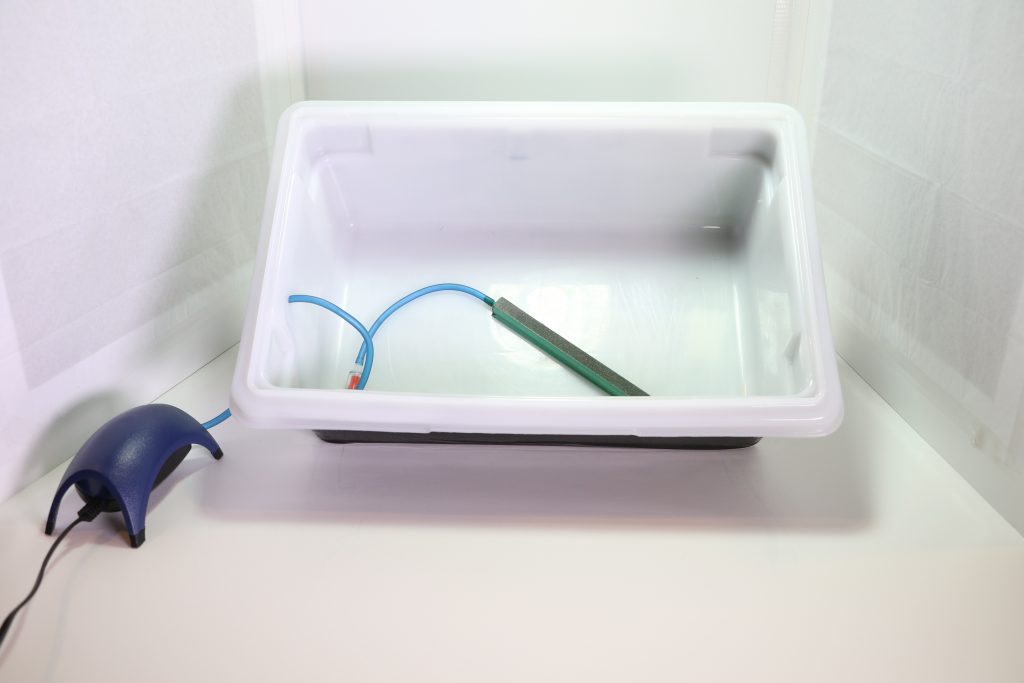
Cut about 4 inches of the 3/16-inch airline tubing to connect the “out” end of your aquarium check valve to your air stone. Then, thread another piece of airline through the hole you drilled and attach the end inside the tub to the “in” end of your aquarium check valve. Measure enough tubing to reach your air pump, clip it and attach it to the pump. Once you have you have all the tubing set up, tape the section between the air stone and check valve to the bottom of the tub. If you don’t, it can become tangled in plant roots later on and potentially damage the roots when nutrient water is added.
7. Pour two gallons of spring water into the tub.
8. Check the particle count in the water using your TDS meter.
Certain plants prefer specific levels os dissolved solids — minerals, salts, metals, etc — in the water. If you’ve researched the preferences of the herbs you’re growing knowing the TDS level can help you decide what amounts of nutrients you want to add to the water. We kept our hydroponic garden simple, so when we tested the water and our result was 80 parts per million, we moved on and followed the suggested directions on the General Hydroponics nutrient bottles.
9. Check the pH level of the water.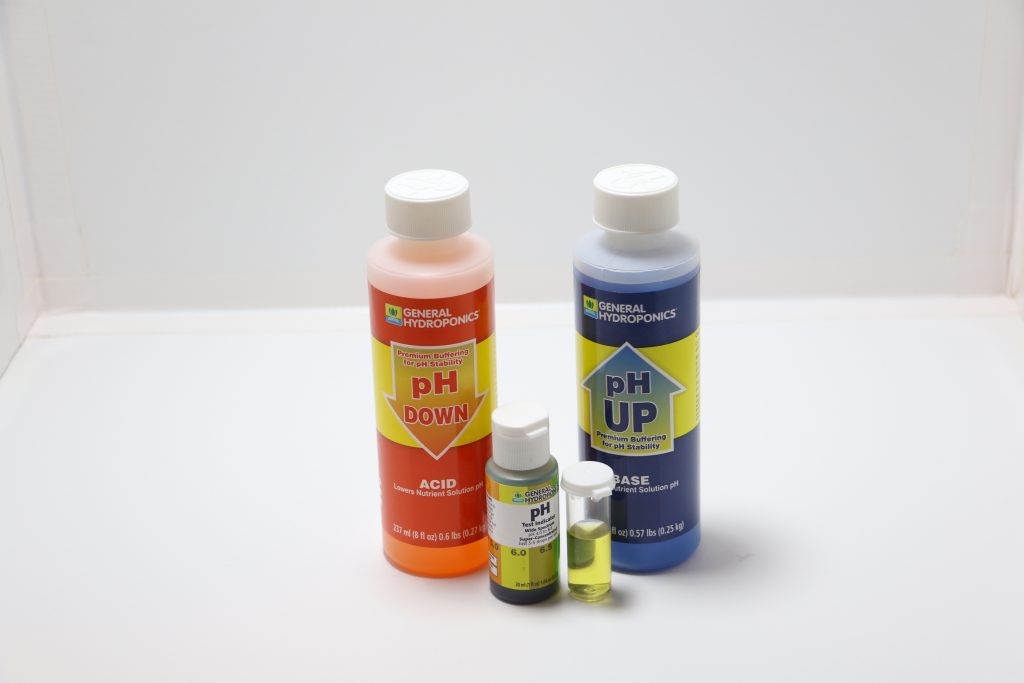
Again, we have to test the pH level of our spring water before mixing in the nutrients. You want to have a pH of 6. Adjust accordingly, using pH up or pH down, if your pH is too high or too low.
10. Add your nutrients.
After you’ve adjusted the pH and accounted for the particle count, you can mix in your nutrients. Remember, the FloraMicro must be added first. Measure out 10 ml and inject it directly into your tub. Next, add 10 ml of FloraGro. Last, add 10 ml of FloraBloom. As the plants grow and you need to mix more nutrient water, you’ll need to reference the General Hydroponics nutrient bottles to increase the amount of nutrients you’re using at more mature stages of development.
11. Add Cal-Mag Plus to water.
This is an optional stage, but I added 5 ml of Botanicare Cal-Mag Plus to prevent yellowing in the leaves of my seedlings.
12. Check particle count again.
After all the nutrients have been added to the water, check the particle count one last time. You want to be around 1,300 ppm.
13. Cover your lid in foil.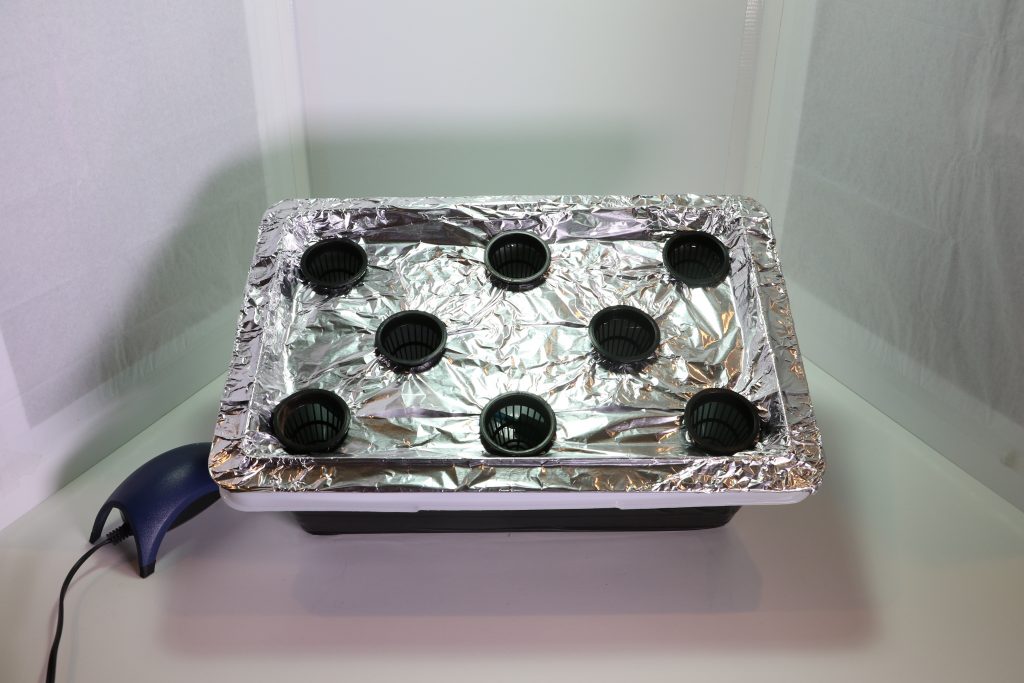
Make sure that the lid to your hydroponic garden is covered in aluminum foil. This helps reflect light back to your plants and helps block light from your water bath. Once it’s all the way covered, poke holes where you’re net pots will be placed.
14. Place net pots into holes.
15. Put seedlings (still in rockwool grow cubes) into net pots.
16. Rinse clay growing media.
17. Place rinsed clay pellets around seedlings to further block out light.
18. Arrange your lights over your hydroponic garden.
19. Plug in your air pump. It should be running at all times.
How to grow a tabletop hydroponics herb garden from Farm and Dairy on Vimeo.
Maintaining your hydroponic herbs
Lighting. Like you did when you started the seedlings, turn your lights off at night to give your plants a period of rest. You’ll also want to make sure to move your lights up as your plants get bigger. In my final attempt having the lights to close to my herbs caused some leaf curling. When I moved the lights up, it alleviated the problem.
Maintain air circulation by harvesting regularly. When your plants are still small air circulation isn’t a concern. However, as they grow, space becomes more and more limited. You must harvest your herbs regularly to maintain good circulation. In my fifth attempt, I didn’t harvest frequent enough and this may have been a contributing factor to the mold that eventually overwhelmed me.
Avoid over-harvesting. While you want to harvest your herbs regularly, cutting them back too much can prevent the plant from recovering. This was the case with my bok choy in my fifth attempt. It grew faster and more bountiful than anything else, so I decided to harvest it to give everything else a chance. When I did, I was too liberal in cutting it back and it never recovered.
Regularly check your nutrient water. If your nutrient water gets too low you’ll notice plant growth slowing down right away. This stresses your plants, so it’s a good idea to check your water levels every few days. That way you can replace it before it gets critically low. Each time you replace nutrient water, you’ll have to go back through the steps of measuring particle count and pH and adding the nutrients. As I mentioned above, you’ll want to adjust the amount of nutrients your adding at more mature development stages of your plants based on the suggested amounts in the table on your General Hydroponics nutrient bottles. It’s a good idea to keep using spring water to mix your nutrient water to make it easier to adjust the pH and ensure your particle count is reasonable.
Mind your root systems. It’s easy to damage the root systems of your plants if you don’t take care when you’re checking water levels and adding nutrient water. Lift the lid of your hydroponic bath slowly to make sure you’re not tearing them in the process.


